These eight pictures tell a story. Starting
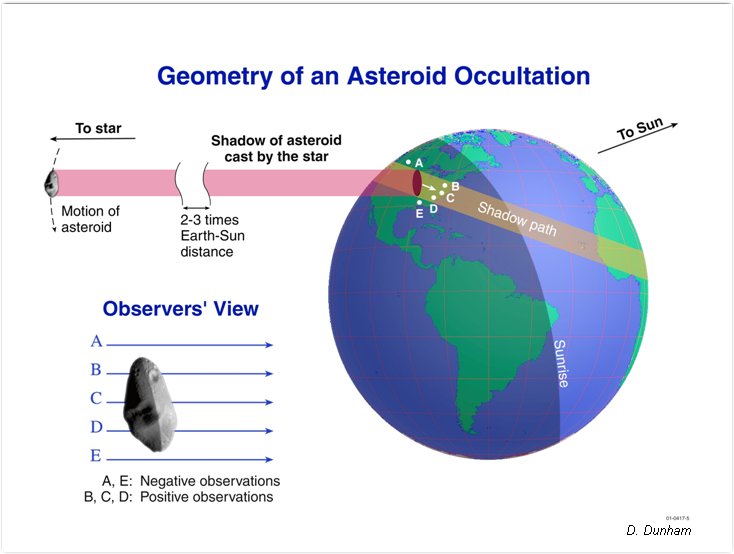
with the geometry of an asteroid occultation event, this is followed
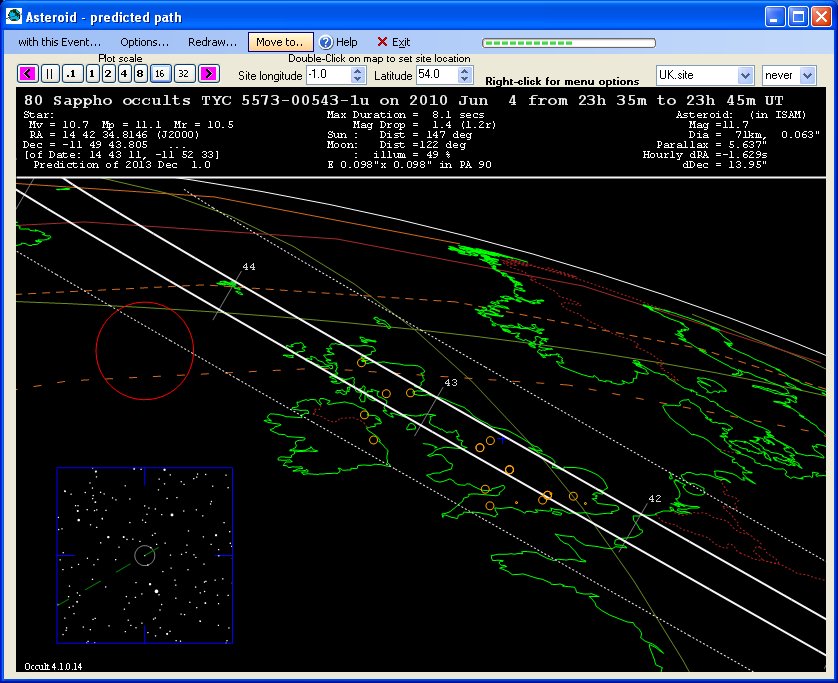
by a typical prediction which will include links to finder charts (e.g.
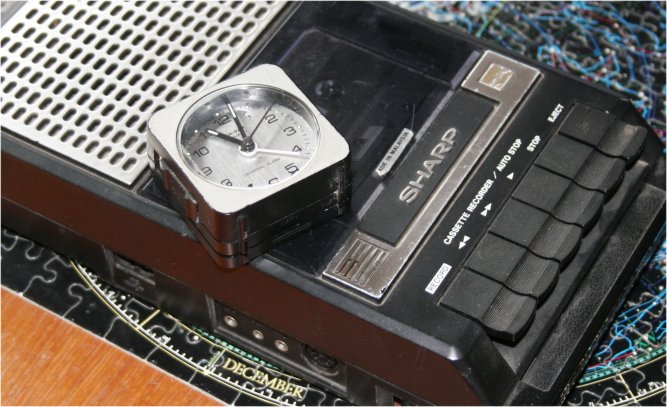
80-Sappho). Timing equipment from a simple audio tape-recorder with
coninuous clock ticks, is followed by some other clocks, watches and
Digital Tape. We then move to a camcorder tape using the internal clock,
and finaly a complete video system with GPS time stamps. The analysis
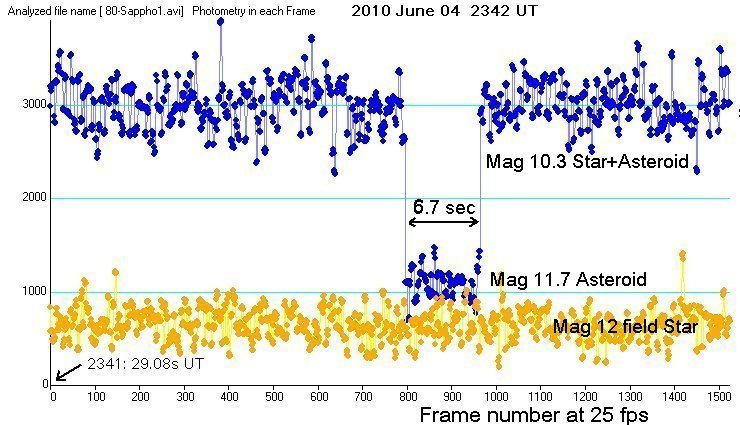
of Video results will produce a light curve (with a dip if your lucky)
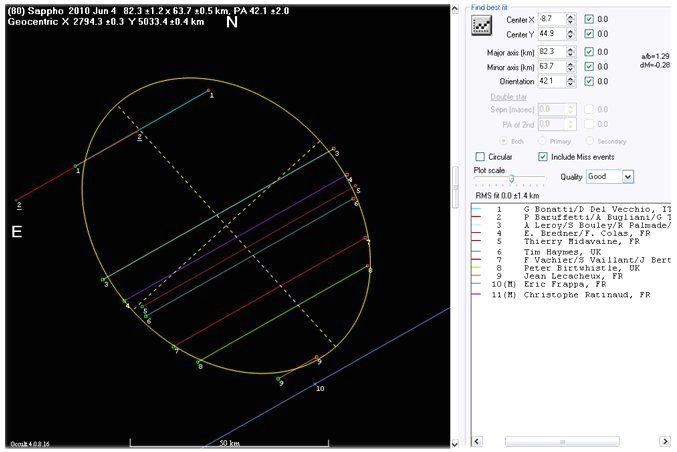
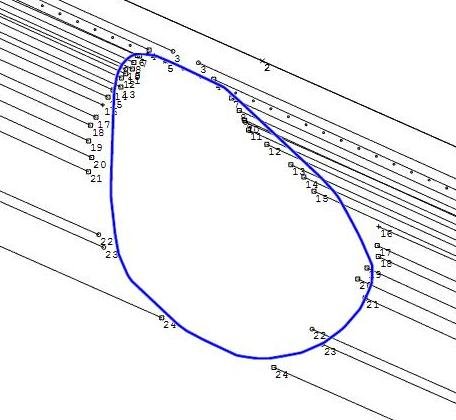
and the results of several observer's can form of an asteroid profile
published by EAON. Your
observation could be one of them. The bit missing from the story is
the telescope. Anything from 4 to 14" will work.
|
|
|
|
|
|
|  |
Star / asteroid / observer
geometry |
Track for 80 Sappho |
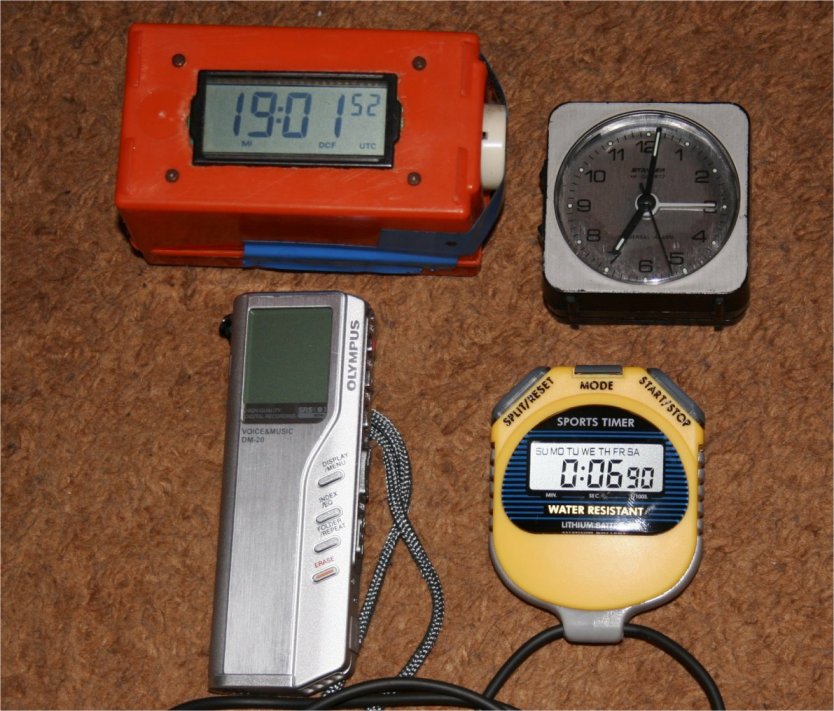
Tape-recorder
and ticking clock |
Digital Tape and clocks |
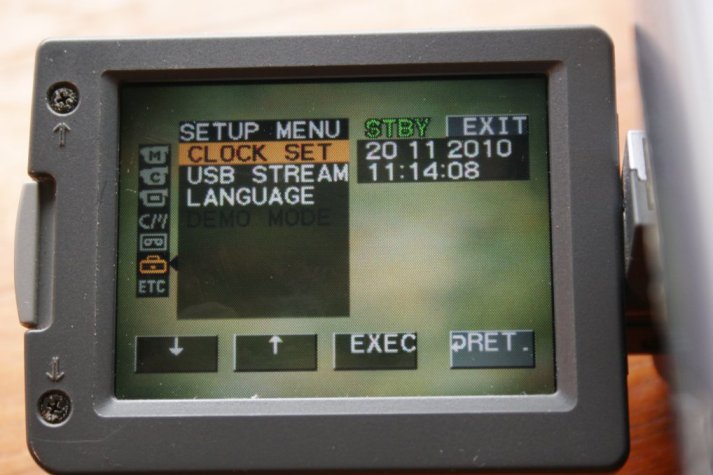
Camcorder tape and clock |
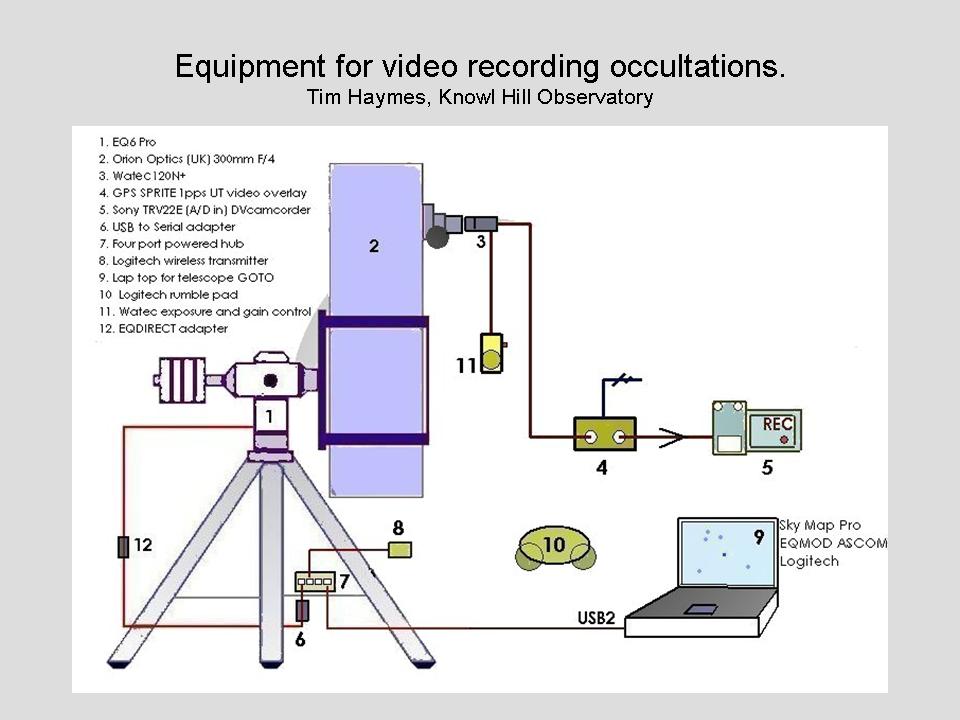
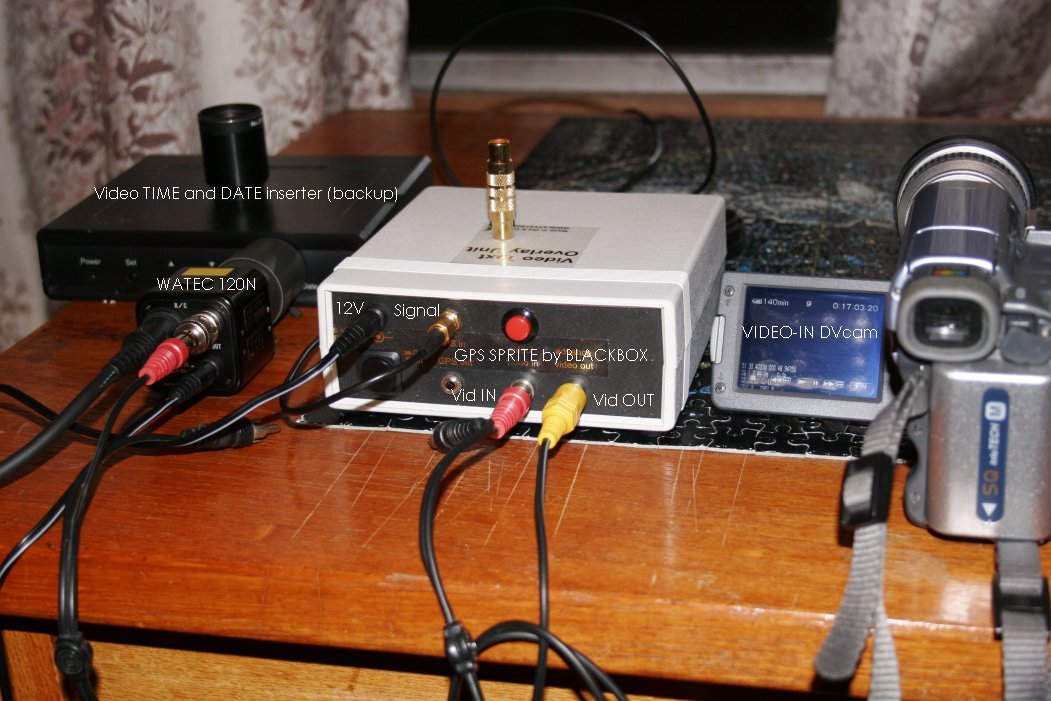
A complete video set up |
Video analysis |
Published result for Sappho |
Why not Observe?
You may be looking for an astronomical pursuit that gets almost instant
results, are time and space predictable and can be selected to fit in
with other interests. Preparation takes about 30min from a garden location
with the telescope set up ready to go. Its satisfying to see an event
(if your fortunate and the shadow passes over) and the timings are highly
valued by scientific professionals world wide. The geographical space
occupied by amatures with their telescopes cannot be underestimated.
So what's involved:
The aim is to find the star (not necessarily the asteroid, as it it
is usually much fainter) and to monitor (watch or record) the star to
see if it disappears or not; and with suitable equipment make a timed
observation of the start and end of
the event with an accuracy of half a second or better relative to UT.
Each observation takes about 5 mins, but is unique to your geographical
location. No other observer will detect exactly the same event. This
make your observation particularly useful to science, because the combined
observations from many observers will produce a outline shape of the
asteroid. This is one of
the objectives. Previously unknown satellites and double stars are also
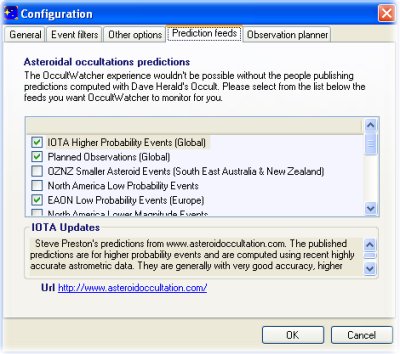
discovered. We use the application OccultWatcher
to help us select and plan observations. Its interesting to know if
observer in England, Spain or the US plan to monitor the same event
for example.
Where do I start?
1) Visual Observation:
Firstly. Find your telescopic
visual limiting magnitude in typical sky conditions and magnification.
I would recommend an 6"-8" or larger aperture for visual observation
and a field of view of say 0.5 degrees. Lets say its magnitude 12. I
suggest an occulted star needs to be 1.5 magnitudes brighter (say v10.5)
otherwise you will find visual detection of a disappearance and reappearance
more of a challenge, and the result may well be less certain (Did I
see it or not?). Uncertain observations are not of great value on their
own unless confirmed by other observers. This is because a NEGATIVE
result (no occultation) has the same importance as a POSITIVE. No harm
in pushing the limits though, as one needs to find what the set-up is
capable off in different conditions (seeing, magnification, sky brightness
etc).
Second. Use Google Earth
and find the longitude and latitude of the observing site ( to 0.1"
arc), and get an estimate of the height above sea level. Check this
on an OS map. The nearest 5m should be fine. There is more info here
Third. If you don't already
have star mapping software on your computer, get one of the free programs
such as Cartes du Ciel
or C2A.
For occultations I prefer C2A because it interfaces with OccultWatcher
(generates a finder chat). Carte du Ciel can control telescopes (via
ASCOM) so it might be worth while to have both softwares installed.
Four Find a
predictions from Global asteroid occultation predictions
by Steve Preston, OR look on my page on Future
Events, OR best of all download OccultWatcher and configure
it to your needs, e.g. to present events brighter than 11, with
tracks within 100 Km say, and duration longer than a few seconds.
There are several feeds to choose from. The IOTA feed is a good
start. There is even a feed for the UK.
Fifth Check the
altitude and azimuth of the target is within your horizon range,
and print off the finder charts.
Sixth Find the
star by star hoping (long time) or GOTO (preferred). Double
check the star field. If tracking, come back 5 min before the
event time, dark adapted and relaxed - use a seat.
Last. Now we
can observe! Use a suitable timing method, one you have tested
and tried and are familiar with. Record the observation times
as accurately as possible. Report if seen (+ve)
or a miss (-ve) |
|
2) Timing methods
In essence the time must be UT using a clock synchronised to a reliable
time signal. More on my web page here.
The most reliable method is to have a continuous time signal recorded
with the observation. One easy option is to use a video camcorder and
use the sound track to record verbal observation, while the internal
clock is running. The clock can be syched to a phone or radio signal
before observing. To obtain times, replay the tape with the date and
time displayed and interpolate to a fraction of a second.
Several stop watches can be used (if you are daring) and stopped on
a phone or atomic clock pip.
3) Video Observations
Video through the telescope is the preferred method
of recording and timing, and requires specific equipment, often in addition
to the average observer's facilities. 1) An integrating video camera,
e.g. WATEC or MINTRON, a video text time overlay (several available)
and a video recorder/digitiser e.g. laptop.
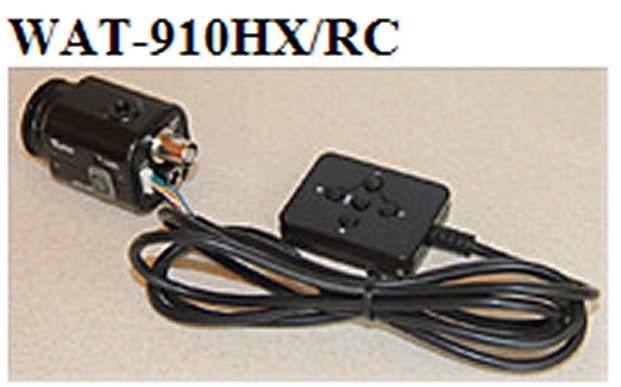
The writer uses a F/4 reflector (8" or 12") a WAT
910HX, GPSPRITE2
GPS time inserter OR alternatively the IOTA
VTI , and a Sony TRV22E DV camcorder for recording. Digital tape
is copied by fire wire to a the PC as AVI. . This is replayed and analysed
at leisure.

4) A useful half-way-house,
is to combine video and visual observation. The camera displays the
star field in real time and the observer watches the screen, timing
the event by what ever means. The visual limiting magnitude is overcome,
but reaction time and observer alertness still limits the observation,
particularly if a small magnitude drop (less that 1 mag) is expected.
The benefit is a much improved display of fainter objects.
5) Drift Scan
Sounds complicated, but is quite a simple
in concept. You may have a 4" refractor or 6" reflector, perhaps
even a Dobsonian.
Focus the star with a DSLR and open the shutter, alowing the star to
drift ( Siderial motor off). An occultation will appear a break in the
trailed star image. Knowing the start time of the exposure and the rate
of drift ( via the declination) we can get all the data from the image.
6) Reporting.
Event times are reported in a standard format (see observing page
) and sent to a coordinator (BAA Asteroids
and Remote Planets section) and to the PLANOCCULT list server for
Europe. OccultWatcher has a report preparation tool that prefills certain
fixed data which ovecomes human error. The most recent option is to
import analysed results as well.
7) In Conclusion.
DSLR, CCD Drift Scan (Great
Shefford Observatory) and planetary web cams are also being used
more widely now. Potential observers are encouraged to investigate different
recording methods provided the timing operation is made good enough.
The more asteroid occultation observers, the better. These links contain
information useful for the beginner and more experienced observers.
UKoccultations
, Asteroids and Remote
Planets , EAON European
Results , IOTA International
Occultation Timing Association
Drift
Scan method, RASNZ
beginners guide
Tim Haymes,
Maidenhead
UK
August 2014
|